don't panic - your data is only stored locally, and cubby is completely open source.
your ai assistant knows what you're working on, what you've read, and what you've discussed
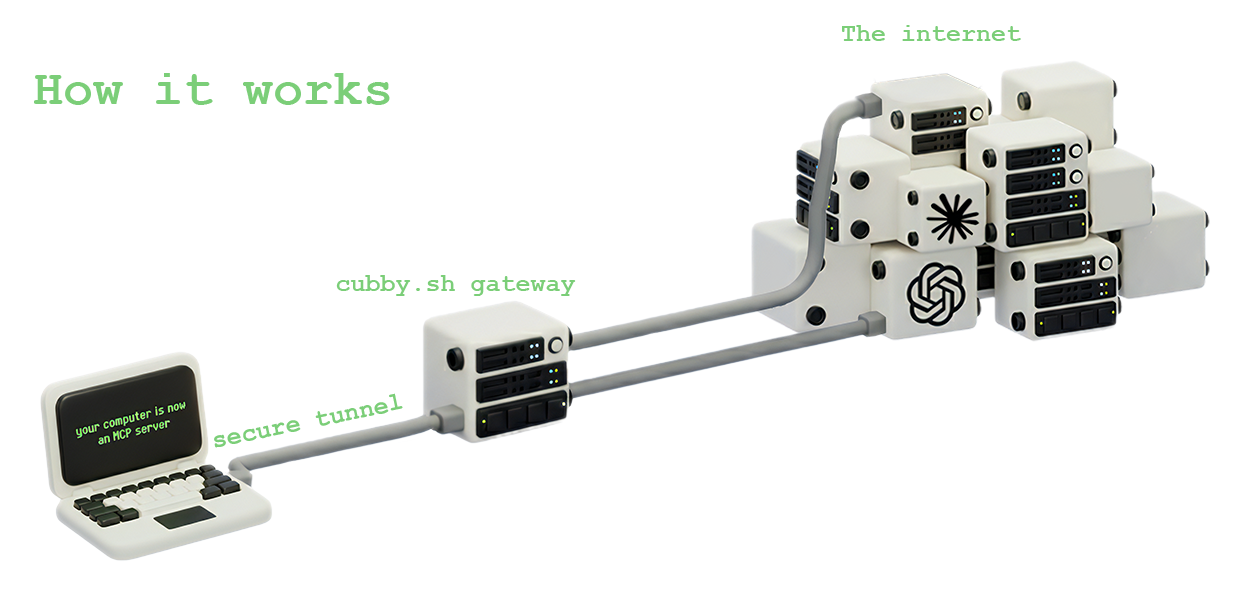
all data stays on your device. you control who accesses it
one install command. works with claude, cursor, and any ai tool
fully transparent. self-host or use our cloud tunnel
one command installs everything. works on macos & linux.
curl -fsSL https://cubby.sh/install.sh | shCLIENT_ID and CLIENT_SECRET~/.cubby/localhost:3030api.cubby.shone-click deploy gives your ai access to your personal memory:
npm i @cubby/jsnode, cloudflare, browser
api.cubby.shopenapi spec available
localhost:3030/mcpclaude, cursor, etc
live events streamed from your screen and microphone
// ocr event
const ocrEvent = {
  name: 'ocr_result',
  data: {
    text: 'design doc - project alpha',
    timestamp: '2025-10-18T12:34:56Z',
    app_name: 'chrome',
    window_name: 'docs.google.com',
    browser_url: 'https://docs.google.com/document/d/...',
  }
};

// audio transcription event
const transcriptionEvent = {
  name: 'realtime_transcription',
  data: {
    transcription: 'let's ship this today',
    timestamp: '2025-10-18T12:35:10Z',
    device: 'macbook-pro',
    is_input: false,
    is_final: true,
    speaker: 'sam',
  }
};

// ui frame event
const uiFrameEvent = {
  name: 'ui_frame',
  data: {
    window: 'zoom meeting',
    app: 'zoom',
    text_output: 'Recording… | Mute | Share Screen',
    initial_traversal_at: '2025-10-18T12:35:20Z'
  }
};use the cubby js sdk in node, cloudflare workers, and browsers. published as @cubby/js
npm i @cubby/jsget credentials at cubby.sh/dashboard
export CUBBY_CLIENT_ID="your_client_id"export CUBBY_CLIENT_SECRET="your_client_secret"query your history
import { createClient } from '@cubby/js';

// credentials auto-detected from env
const client = createClient({
  baseUrl: 'https://api.cubby.sh',
  clientId: process.env.CUBBY_CLIENT_ID,
  clientSecret: process.env.CUBBY_CLIENT_SECRET,
});

// list devices and select one (for remote)
const { devices } = await client.listDevices();
client.setDeviceId(devices[0].id);

// find that article you read last week
const results = await client.search({
  q: 'dolphins',
  content_type: 'ocr',
  limit: 5
});process live events and trigger actions
// auto-create todoist tasks from spoken todos
for await (const event of client.streamTranscriptions()) {
  if (event.text?.toLowerCase().includes('todo')) {
    const task = await ai.generateStructuredOutput({
      prompt: `extract task from: "${event.text}"`,
      schema: { title: 'string', priority: 'high|medium|low' }
    });
    await todoist.create(task);
    await client.notify({
      title: 'task added',
      body: `"${task.title}" - ${task.priority} priority`
    });
  }
}power ai with your personal context
// smart email responses based on recent chats
const recentChats = await client.search({
  q: 'slack messages project alpha',
  content_type: 'ocr',
  limit: 15
});

const draft = await ai.chat.completions.create({
  messages: [
    { role: 'system', content: 'draft professional email' },
    { role: 'user', content: `context: ${JSON.stringify(recentChats)}` }
  ]
});
await gmail.users.messages.send({ raw: encodeDraft(draft) });build smart automations
// auto-log work hours when specific apps are active
for await (const event of client.streamVision()) {
  if (event.data.app_name === 'Linear' && event.data.text?.match(/ENG-\d+/)) {
    const ticketId = event.data.text.match(/ENG-\d+/)[0];
    await timeTracker.startTimer({ project: 'engineering', ticket: ticketId });
    await client.notify({ title: 'timer started', body: `tracking time on ${ticketId}` });
  }
}model context protocol (mcp) gives ai assistants direct access to your cubby data.
add to your mcp config:
{
  "mcpServers": {
    "cubby": {
      "type": "streamable-http",
      "url": "http://localhost:3030/mcp"
    }
  }
}use https://api.cubby.sh/mcp with bearer token authentication
curl -X POST https://api.cubby.sh/oauth/token -d "grant_type=client_credentials&client_id=ID&client_secret=SECRET&scope=read:cubby"{
"mcpServers": {
"cubby": {
"type": "streamable-http",
"url": "https://api.cubby.sh/mcp",
"headers": {
"Authorization": "Bearer YOUR_TOKEN"
}
}
}
}deviceId parameterlist enrolled devices
select device for calls
search content
fast keyword search
find speakers by name
launch applications
open urls in browser
send notifications
list audio devices
list monitors
frames, tags, embeddings
full openapi spec for custom integrations
# runs on localhost:3030 after install
curl http://localhost:3030/openapi.json

# example: search content
curl "http://localhost:3030/search?q=project&limit=10"GET /searchsearch across screen, audio, uiGET /search/keywordfast keyword searchGET /speakers/searchfind speakersPOST /open-applicationlaunch appsPOST /open-urlopen urlsPOST /notifydesktop notificationsWS /eventsstream live events# authenticate
curl -X POST https://api.cubby.sh/login \
-H "Content-Type: application/json" \
-d '{"email": "you@email.com", "password": "pass"}'
# list devices
curl -H "Authorization: Bearer TOKEN" \
https://api.cubby.sh/devices
# search on specific device
curl -H "Authorization: Bearer TOKEN" \
"https://api.cubby.sh/devices/DEVICE_ID/search?q=hello"